
Introduction
For this post, I’m going to provide a breakdown of the different iterations of infrastructure setups that this project has gone through. Additionally, I’ll provide insights into what factors lead into the various decisions that were made, a cost analysis, and whether I have any regrets.
Initial Goals and Optimization Criteria
Going into this project, my experience with authoring a NodeJS based service application was very limited. As a result, I wanted to select architectural patterns that would maximize my ability to learn new innovative things. After all, part of the goal with creating this application was refreshing and modernizing a bit of my skill sets.
Coupled with the above, all of the code that I had written on this subject were random bespoke scripts that did an assortment of musical things.
Taking into account the above, I decided on the following goals:
- Infrastructure must be quick to setup
- Infrastructure must be simple
- Infrastructure setup must be cheap (since I’m paying for all this myself)
- Infrastructure must use things that I’d need to learn about to use
Iteration 1: Serverless
At around the time I decided to build this project, I had a pair of friends that were working on a startup called Eventual. The high level summary on Eventual is that it was a serverless framework designed to be run on AWS, and heavily abstracted away a lot of the underlying infrastructure questions. The logic here was that it allowed developers to focus more on code and less on infrastructure. For myself, as someone who has been repeatedly beaten down by horrible oncall rotations, dealing with infrastructure maintenance is the last thing that I wanted to touch in the context of a side project.
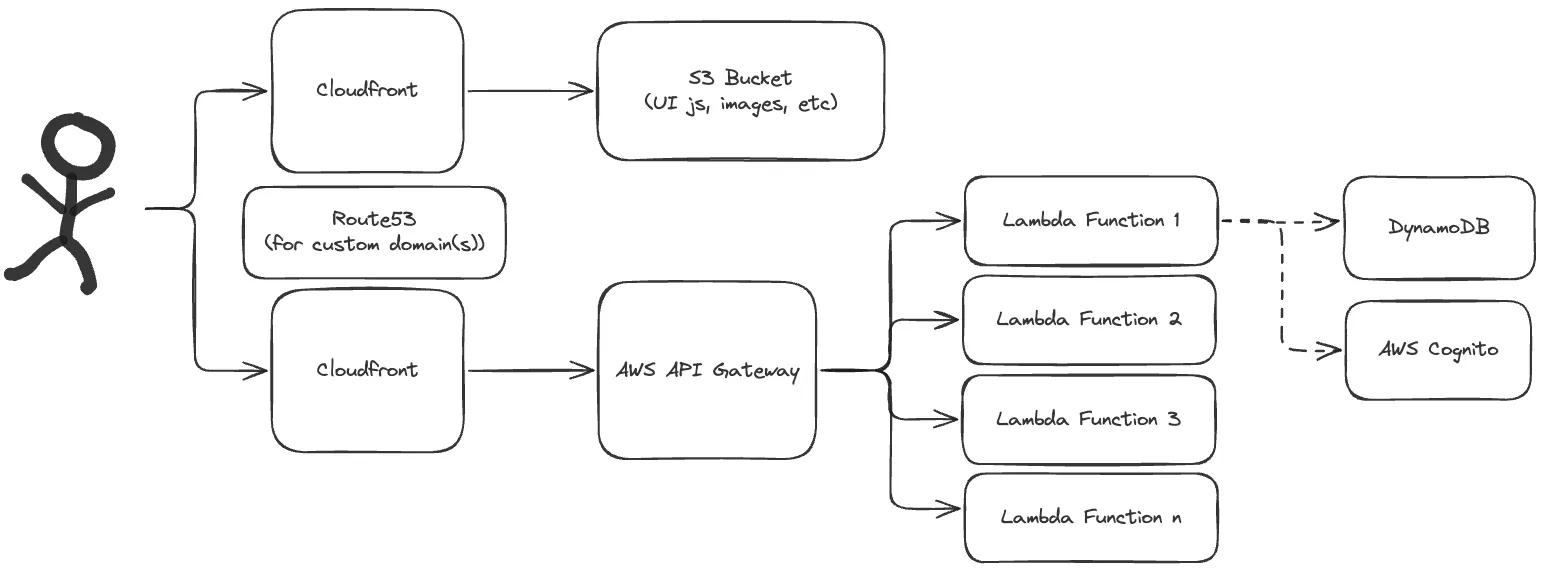
With all of that in mind, I decided to choose an architecture that used AWS Lambda functions and AWS API Gateway, leveraging the Eventual framework. With this approach, I could learn about serverless design patterns while also providing my friends with feedback on their work as a customer.
The below diagram basically captures the structure of my setup for this iteration:

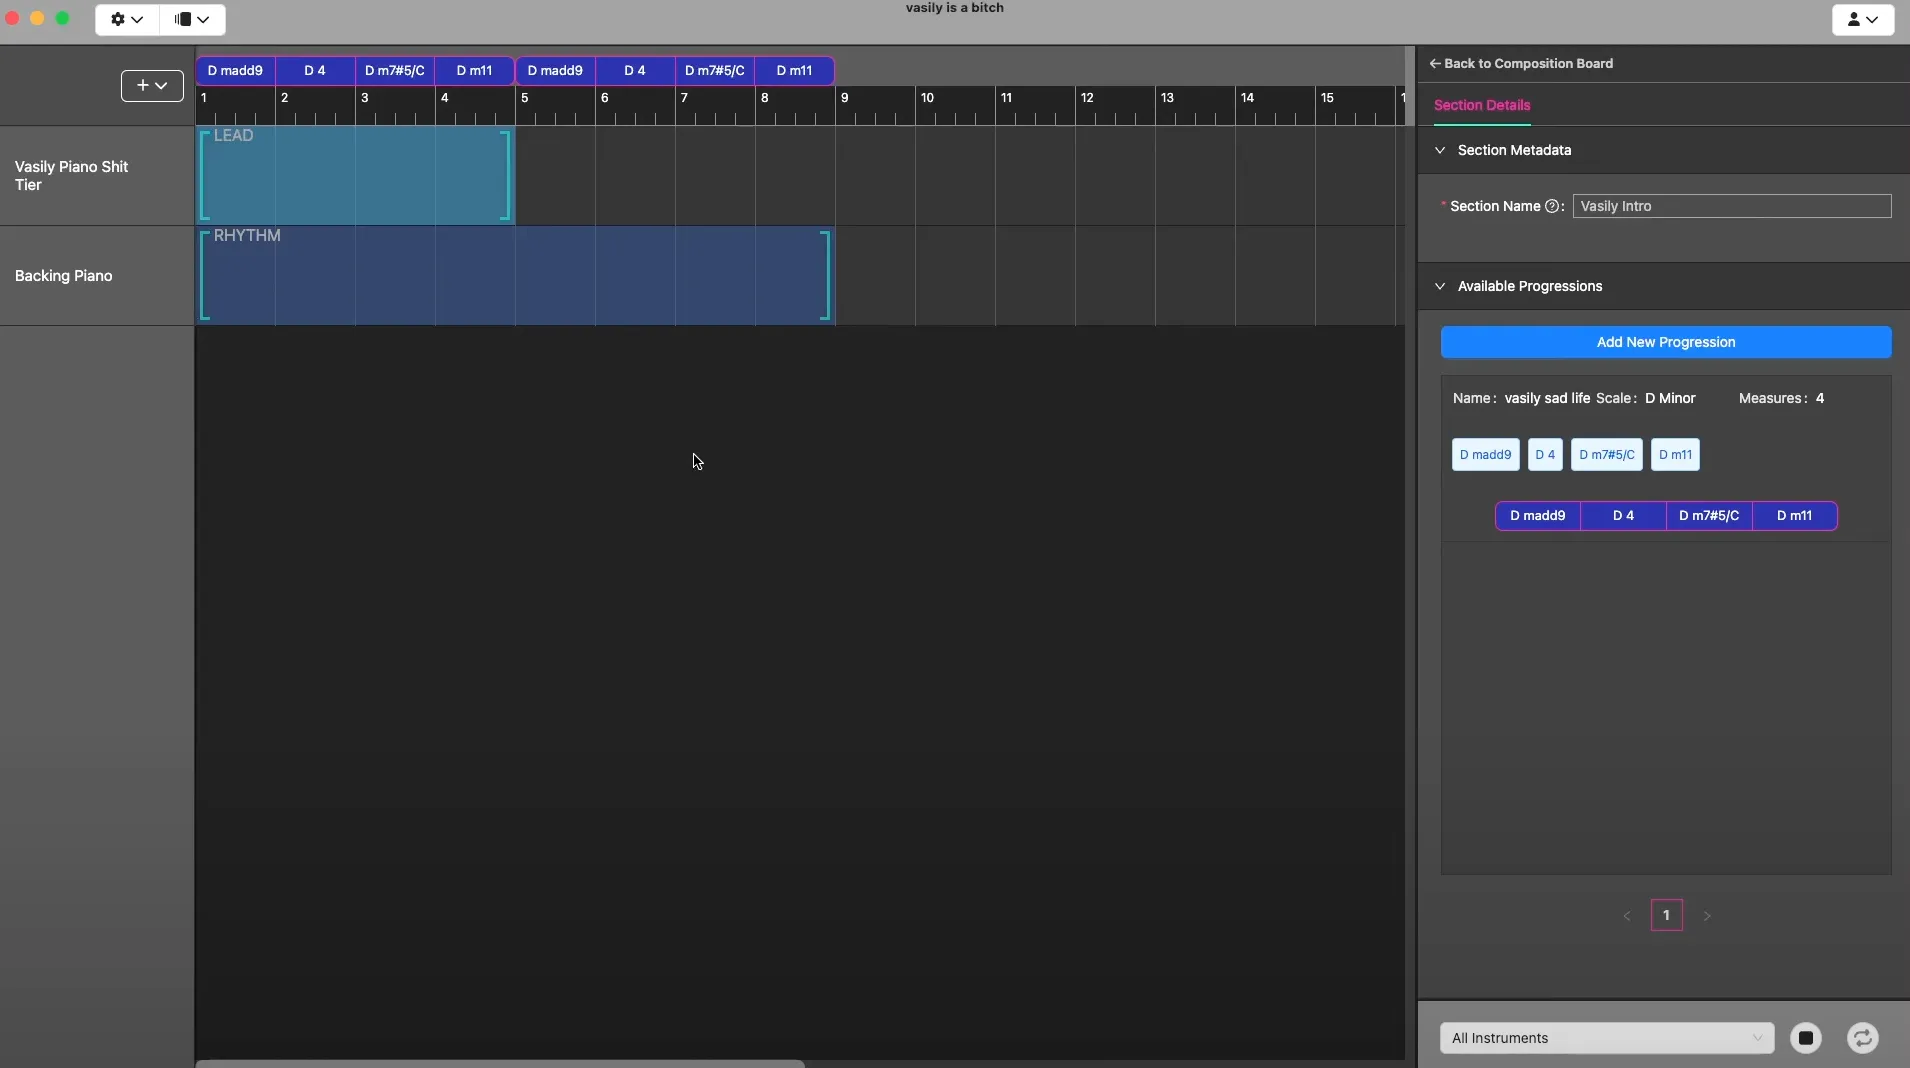
Also, here is a screenshot of what an early prototype looked like around this time:

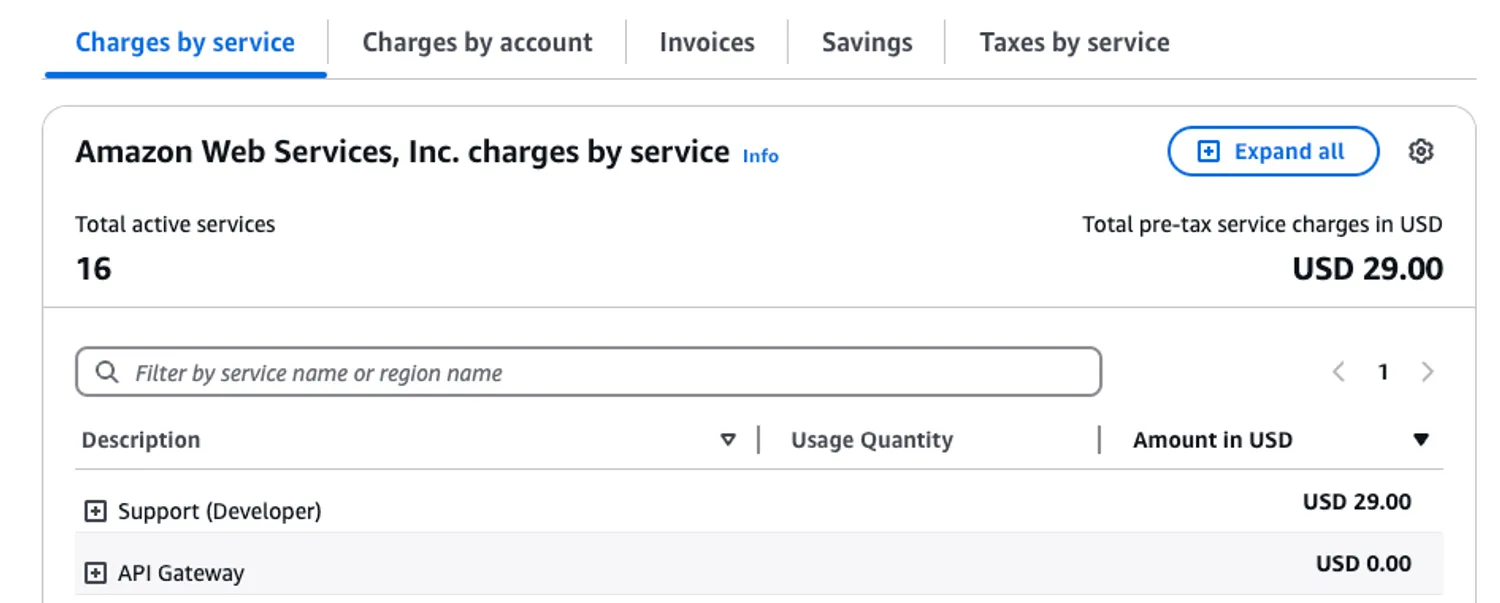
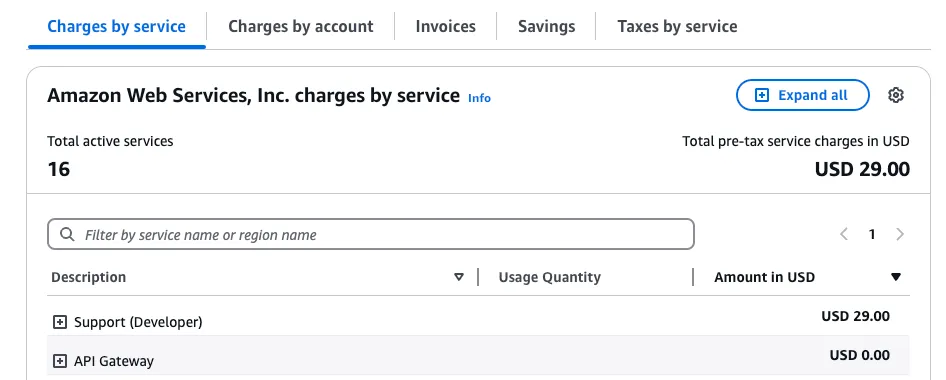
With this combination, my AWS bill was basically $0 USD in cost. This is due to how AWS structures free tiers for cloudfront, Lambda, S3, and more.
It was technically $29 dollars, but that was due to me paying for the optional Developer Support Plan. I’ll be excluding that value since it’s entirely optional and provides no functions in terms of infrastructure.
I rolled with this setup for a while, but it had a few problems with it. One of those problems was the Lambda Cold Start problem.
Deciding to Switch Off of Serverless
About the Cold Start Problem
The cold start problem is relatively simple. When an AWS Lambda function environment is spun up, there is a period of extra latency that is incurred while the environment pulls your code and gets initialized. This can happen due to inactivity, scaling, or any other arbitrary reason based on platform behavior. After developing for a while, I started to notice the cold start latency during testing. I found the extra latency to be infuriating. There are ways to mask the cold start issue, but I wasn’t willing to address that problem for the scope of a side project.
About SAM (Local Development)
Another issue that I repeatedly ran into was the complexity of using SAM for local testing. SAM itself is complex, and even more so when using lambdas in conjunction with API gateway. I was not able to iron out a smooth workflow, and ended up resorting to using CDK hotswapping as a mechanism to update a mirrored stack that I had setup for testing. This process ended up introducing roughly 2-5 minutes between testing each iteration. This was extremely slow by my standards.
This testing friction, combined with the cold start issues, made it increasingly clear that serverless might not be the best fit for my development style and requirements.
Serverless and an Over Reliance on AWS
One thing that I started to realize with serverless - and this is potentially a hot take opinion - is that if I ever wanted to do anything that exceeded the bounds of lambda, such as websocket/streaming stuff or any GPU bound task, I’d basically be forced to lean extremely hard into the rest of AWS’s product offerings (some of which simply aren’t worth their price).
For example, AWS API Gateway charges $0.25 per connection minute when making a Websocket API. This simple pricing model now means that:
- Simple scenarios like a user stepping away for lunch could run the meter
- I don’t have control over the server side handling of the websocket connection.
- An additional cost exists for message transfers, so an awareness is needed of that as well.
From a cost point of view, implementing a Netty server (or whatever the JS equivalent is) seems more cost efficient and avoids vendor lock in. There is the counter point of development effort being more expensive than infrastructure costs, and my retort to that is that we should all strive to be the 1000X engineers that we were born to be, and beat that equation.
End of the Eventual Framework
The nail in the coffin was when my friends decided to step away from the Eventual framework they had been building. As a result of that, my project was left being built on top of a framework that would no longer be receiving regular updates.
I didn’t want a situation where I’d continue to develop this using a dead framework. Eventually I’d run into a situation where I would not be able to implement Feature X because an AWS dependency was out of date, or I was prevented from upgrading to Node ~29 because of old code.
Iteration 2: Containers with ECS
Taking into account all of the factors I described previously, I decided to switch to an actual service architecture. Up to this point I had already had extensive experience with EC2 in a professional capacity, so by default I excluded that as an option since it didn’t comply with my “learn new things” requirement.
I briefly considered Kubernetes (AWS EKS), but it seemed less compelling of an option than ECS. It has the benefits of being portable knowledge for when I inevitably rage quit my job, but the massive amount of extra overhead did not make this option seem viable.
With that being said, I had never used ECS or Docker. Switching to ECS seemed like the natural best option since it was new to me and very well integrated with AWS CDK (minimizing switching costs).
Migrating off of Lambda
Since all the service-side code I had written up to this point was written and designed around the concept of Lambdas and the Eventual framework, my only option was to do a complete rewrite as part of the migration. For this, I spent a bit of time investigating what would be the best candidate service framework to switch to.
My criteria was as follows:
- Had to be a NodeJS framework
- It had to be as performant as reasonably possible so I could squeeze the most amount of juice out of my hosts
- Had to have good documentation
- Had to be well maintained
I ended up settling on Fastify as it seemed more well maintained and more performant than the alternatives. I didn’t test for this myself, but instead just relied on random resources I found off of Google:
- https://www.cbtnuggets.com/blog/technology/programming/express-vs-fastify
- https://news.ycombinator.com/item?id=38059004
- https://medium.com/@alielmalki.developer/fastify-vs-express-which-is-the-best-api-framework-for-node-js-4bad807af0d9
- https://www.inkoop.io/blog/express-vs-fastify-in-depth-comparison-of-node-js-frameworks/
Migrating my code onto Fastify patterns was relatively easy and straight forward. Fastify documentation is mostly sufficient, and the entire process took me about one week of After Hours programming.
With this completed, I had a working service that could be accessed via localhost, but was not Docker ready, and did not have access to any AWS dependencies.
Creating a Container Image
For using AWS ECS, I decided to store my images in AWS Elastic Container Registry (ECR) as integration seemed straightforward with AWS CDK.
I created a Dockerfile for my service:
# I'm using the latest Amazon Linux image
FROM public.ecr.aws/amazonlinux/amazonlinux:latest

# I had to manually do this because the Amazon Linux image
# doesn't come with nodejs 20 installed out of the box
RUN dnf install nodejs20 -y
# This was for the same reason. I execute node-20 later
RUN ln -s -f /usr/bin/node-20 /usr/bin/node
RUN ln -s -f /usr/bin/npm-20 /usr/bin/npm

# Print Node.js and npm versions for debugging purposes
RUN node-20 -v && npm-20 -v

# Install AWS CLI
RUN dnf install -y aws-cli

# Create app directory
WORKDIR /usr/src/app

# Install app dependencies
COPY package*.json tsconfig.json ./

# Ensure the local npm bin directory is in the PATH
ENV PATH=/usr/src/app/node_modules/.bin:$PATH

# Bundle app source
COPY . .

# Run the prepare_runtime script and capture output
RUN npm-20 run build

# Expose the port the app runs on
EXPOSE 5000

# Run the application
CMD [ "npm-20", "start" ]
I chose amazon-linux as the distribution purely because it comes with a bunch of pre-installed AWS dependencies, and is designed to work on AWS infrastructure. Because of this decision, I ended up having to add instructions to manually install NodeJS 20 because (for reasons that I’ve already committed to my mental tape storage) NodeJS 20 is a separate package.
After that, suprisingly this is about all the code it takes to get your image into ECR and into an ECS service:
// TODO: There is probably a better way to get this resource path
const __dirname = path.dirname(fileURLToPath(import.meta.url));
const resourcePath = path.join(__dirname, RELATIVE_PATH_TO_FASTIFY_SERVICE);

const dockerImageAsset = new DockerImageAsset(this, `ContainerImage`, {
    directory: resourcePath,
    platform: Platform.LINUX_ARM64
});

const container = fargateTaskDefinition.addContainer(`ContainerDefinition`, {
    image: ContainerImage.fromRegistry(dockerImageAsset.imageUri),
    memoryLimitMiB: 1024, // This is as cheap as you can get
    cpu: 256, // same here, testing only
    environment: {
        'NODE_ENV': 'production',
        // ... my long list of environment variables go here
    },
    healthCheck: {
        command: [
            'CMD-SHELL',
            'curl -f http://localhost:5000/healthcheck || exit 1'
        ],
        interval: Duration.seconds(60),
        timeout: Duration.seconds(5),
        retries: 3,
        startPeriod: Duration.seconds(60)
    },
    logging: LogDrivers.awsLogs({
        streamPrefix: 'ContainerService'
    })
});
The minimum viable configuration (1024MB memory, 256 CPU units) are there to keep costs low during development. While this will need adjustment under real load, it’s sufficient for testing and initial deployment for a single person (or a small team).
There is more involved after this, such as setting up like setting up port mappings and Load Balancer listeners. Those are relatively straightforward and documented extensively throughout the internet so I’ve omitted those details.
Local Development
I found this docker ECS setup to be significantly better than the serverless lambda approach because Amazon vends an Amazon ECS Local Container Endpoints docker image. This combined with using Docker Compose resulted in my being able to basically test all aspects of my service (including AWS integration) extremely easily. The second benefit was that, unlike with SAM’s inconsistent local behavior, this setup achieves near-parity with my actual production system - what works locally reliably works in production.
Final Architecture
The below diagram captures the final architecture that I settled on for my AWS infrastructure:
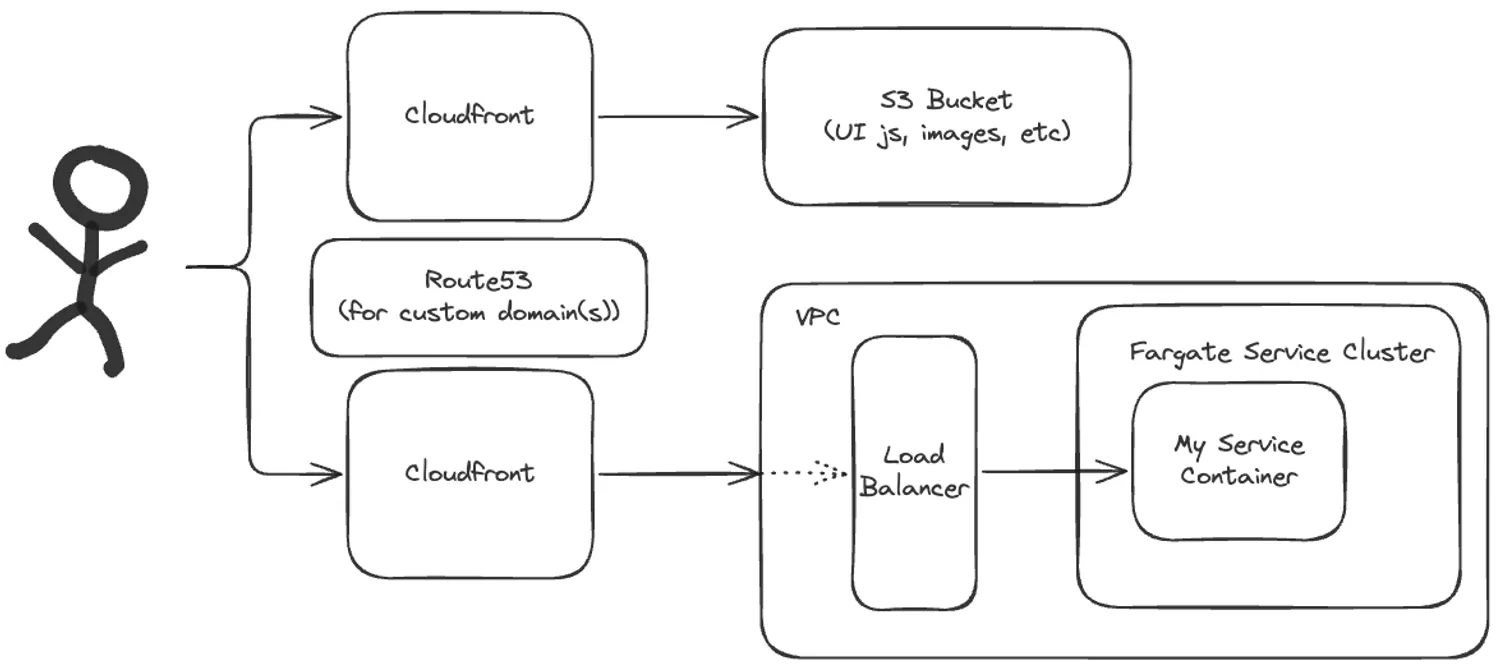

I’ve omitted a few elements from the above diagram, mainly the NAT Gateway and the various gateway endpoints needed.
Final Bill
Using the cheapest ECS configuration, the monthly bill for this project comes out to:
| Service | Monthly Price (USD) | Notes |
|---|---|---|
| NAT Gateway | $33.65 | NAT Gateways are basically a fixed $30 cost, and then additional cents per GB if ingress/egress |
| Load Balancer | $16.74 | Load Balancers are kind of a best practice thing, but might not be TECHNICALLY needed |
| KMS (key Management) | $11.93 | I’m using this to safely store NPM tokens and other necessary keys |
| VPC public IP | $11.16 | |
| ECS | $8.67 | This is the cheapest configuration they have. The price after scaling will likely be 2-8x this cost |
| WAF | $7.00 | This is a firewall service that I enabled on CloudFront. All those hackernews posts about OpenAI spam bot crawlers made me paranoid |
| Route53 | $1.03 | |
| ECR | $0.56 | I store docker images here |
| S3 | $0.13 | Frontend assets are stored in S3 |
Total: $90.87 USD
It’s important to note that these costs reflect development-only usage. In production, several components could scale significantly:
- Fixed Costs: NAT Gateway ($30) and Load Balancer base charges will remain relatively stable
- Traffic-Based Costs: NAT Gateway data transfer, WAF, and Load Balancer costs will scale with usage
- Compute Costs: ECS costs will likely be the most significant scaling factor, potentially increasing 2-8x with real user traffic
The actual production costs could increase by an order of magnitude depending on traffic patterns. Given this is just a side project, I’ve opted to start with the minimum viable configuration and scale up only when necessary.
Final Thoughts
This blog post isn’t an advertisement for AWS, I could’ve subbed out AWS for GCP or Azure and have yielded the same result with a relatively comparable monthly bill. I chose AWS primarily because of the strengths of AWS CDK. I did learn a lot from this exercise, such as how to use docker in a pseudo-production capacity.
Key Takeways
- Testing serverless infrastructure on AWS was frustrating and full of unexpected gotchas.
- There’s always “one more thing” needed in cloud infrastructure. My setup is intentionally simplified - running in a single AZ without full redundancy - because each additional layer of reliability comes with both complexity and cost.
- Cost management ended up being a top priority. There are a few features like multiplayer editing that I wanted to add, but then chickened out of because I didn’t want to pay for large load on MemoryDB or ElastiCache. I only included the NAT Gateway (my most expensive item) because I wanted to keep the door open on Stripe egress.
- My Docker setup was a big pill to swallow in the beginning, but I ended up really enjoying the finished product there, especially in conjunction with Docker Compose.
To summarize, this is the story of how a “free tier” project evolved into a $90/month infrastructure as it grew to meet real-world requirements. It’s a testament to how production-ready infrastructure, even for a side project, requires careful balance between features, reliability, and cost.